Restore sand to its original playing state and colour by washing it
Eliminate sand replacements and reduce touch-ups of your bunker sand by washing it instead
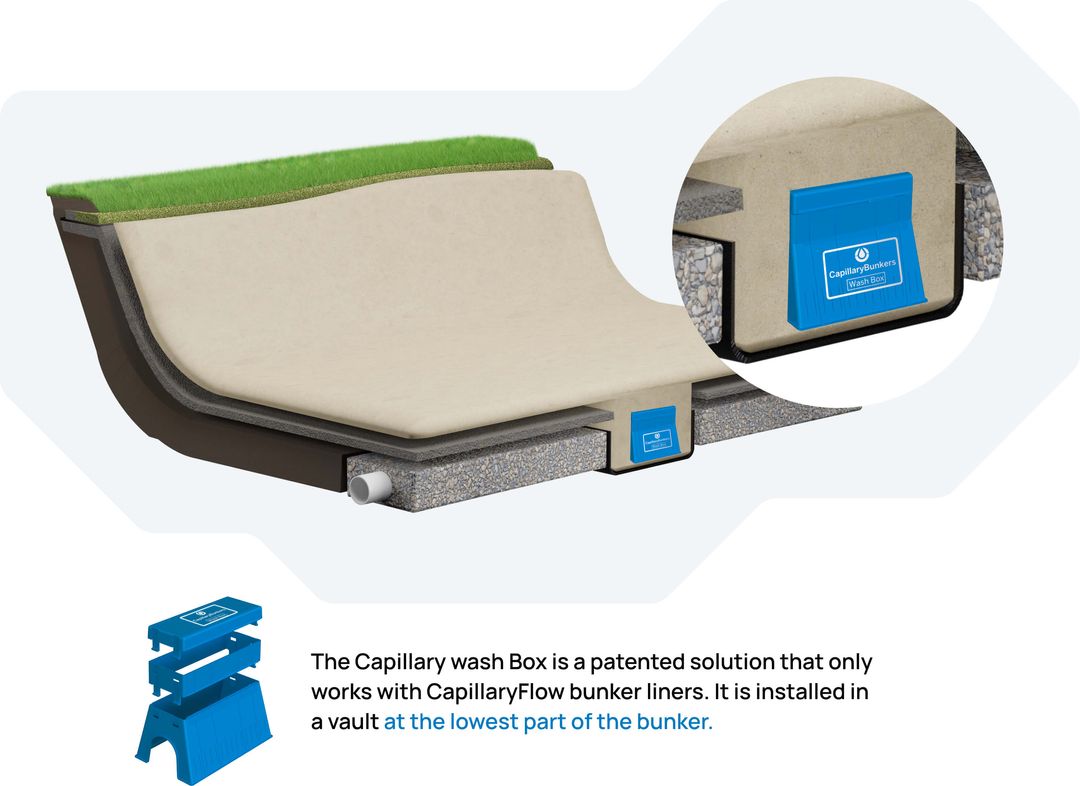
The Capillary Wash Box is an effective solution for washing algae, debris, silt, clay, and organic pollutants from bunker sand. By doing so, it preserves the sand’s percolation rate, colour, and desired playing properties while eliminating the need for frequent sand touch-ups and replacements.
The Capillary Wash Box: part of our complete bunker protection system
Protect your investment in bunker sand by washing it instead of replacing it
CapillaryFlow Bunker Liner
Drains with a rate of more than 100 inches per hour and moves moisture back up, preventing washouts and sand escaping from faces
The only bunker liner with the possibility to wash the sand
- CUTTING SAND COSTS BY ⅔
- IMPROVING AESTHETICS
- RESTORING DRAINAGE & PLAYABILITY TO OPTIMAL STATE
Learn More
About CapillaryFlow
Our Vision
A world where building low-maintenance natural spaces for sport and leisure is easy and sustainable.
Our Mission
Provide sustainable, durable and trouble-free greens and grounds for sport and leisure
We are a technology company whose patented innovations are enabling golf courses, sports grounds, and other leisure spaces like city parks to build long-lasting and low-maintenance greens, bunkers and grounds.
Controlling the water, carbon dioxide and oxygen levels for various soil profiles in these spaces is a major challenge. Our proprietary CapillaryFlow technology offers a simple solution that ensures optimal moisture levels and good drainage regardless of the weather conditions.
Capillary Material is the common factor across most of our solutions including Capillary Bunkers, Capillary Hydroponics, and Capillary Geothermal. It is a patented and engineered polymer-based concrete that is the only building material that can move water both up and down to precisely regulate the moisture content of any adjacent material, such as sand or soil.
From golf courses to sports fields, equestrian arenas and city squares
Over the last 15 years, our innovations have transformed the way the golf industry constructs bunkers and greens. It was but natural for us to progress into adjacent fields.
We understand the challenges of constructing, maintaining and regulating moisture levels in golf courses, sports fields, equestrian arenas and city parks and squares. Everything we develop is tested in real-life situations – over and over again. We work with some of the most advanced laboratories in the world to develop the best and most effective solutions for our customers.
Centaur Asia Pacific is the exclusive distributor for CapillaryFlow in Australia, New Zealand, Hong Kong, Macau, Singapore, Malaysia, Vietnam, Cambodia and Thailand among other countries in Southeast Asia.
Updated on: 24 July 2024